Showing posts with label facebook. Show all posts
Showing posts with label facebook. Show all posts
Sunday, January 8, 2017
Official Facebook Recommendations Bar Widget for Blogger Blogspot
Official Facebook Recommendations Bar Widget for Blogger Blogspot
Facebook Introduced their brand new social social plugin called Facebook Recommendations Bar. It is Beta Plugins.
In this tutorial, we go to learn how to install Facebook Recommendations Bar in Blogger Blogs. This widget is more helpful to drive traffic from Facebook with and instant likes and related posts.
Preview
Official Facebook Recommendations Bar Widget Preview
OR
You can take a look at Right Bottom of this Page and see it’s action in Live!
How to Install the Official Facebook Recommendations Bar Widget?
In order to work the Facebook Recommendations Bar every blog should must have the Facebook Open Graphs meta tags.
I found the simplest and Working Facebook Open Graphs tags on GitHub gist. Thanks to pathawks.!
Add the Following code after <head> tag.
<!-- Begin Open Graph metadata -->
<b:if cond=data:blog.pageType == "item">
<meta content=article property=og:type/>
<meta expr_content=data:blog.title property=og:site_name/>
<meta expr_content=data:blog.pageName property=og:title/>
<b:if cond=data:blog.postImageThumbnailUrl>
<meta expr_content=data:blog.postImageThumbnailUrl property=og:image/>
</b:if>
<b:else/>
<meta expr_content=data:blog.title property=og:title/>
<meta content=website property=og:type/>
</b:if>
<meta expr_content="en_US" property=og:locale/>
<meta expr_content=data:blog.canonicalUrl property=og:url/>
<!-- End Open Graph metadata -->
First Go to Facebook Recommendations Bar Official Page.
Directly click the Get Code Button.
Official Facebook Recommendations Bar Widget for Blogger / Blogspot step one
Click on Create a new app Link
Official Facebook Recommendations Bar Widget for Blogger / Blogspot step two
Enter the App Name with your Blog Title and App URL with your Blog URL, like as below and Click Continue button.
Official Facebook Recommendations Bar Widget for Blogger / Blogspot step three
Enter Captcha Code Correctly and Click Submit button
Official Facebook Recommendations Bar Widget for Blogger / Blogspot step four
Then Click the Get Code Button once again.
Official Facebook Recommendations Bar Widget for Blogger / Blogspot step five
Copy the First JavaScript SDK code (First Box Code) and Encode the Code using This Tool
Official Facebook Recommendations Bar Widget for Blogger / Blogspot step six
Login to New Blogger Dashboard > Choose your Blog and Click the More Options Dropdown
Select the Template > Click on Edit HTML > Proceed
Check/Tick the Expand Template Widgets checkbox
Search for <body> tag and place the Copied code After <body> tag.
Facebook Recommendations Bar Customizations:
You can customize the Facebook Recommendations Bar settings
Settings
Position:
Action
Trigger
Read Time
Number of Recomednations
Search for <data:post.body/> tag and place the following code after the <data:post.body/> tag
<b:if cond=data:blog.pageType == "item"><div class="fb-recommendations-bar" data-trigger="onvisible" expr:data-href="data:post.url" data-read-time="30" data-action="like" data-side="right" expr:data-site="data:blog.homepageUrl" data-num-recommendations="2"></div></b:if>
Save the Template, Enjoy :)
Please dorp your comments and share this post.
Go to link download
Saturday, January 7, 2017
Official Facebook For BlackBerry Version 1 9 0 28
Official Facebook For BlackBerry Version 1 9 0 28

If youd like to upgrade to the latest version of Facebook on your BlackBerry device, complete the following steps:
- Open Facebook on your BlackBerry device
- Press the Menu key and select Options
- Scroll down and select the option Check for Upgrade Now
Or download from the link:
Click here to download
Go to link download
Tuesday, December 20, 2016
No more LOLs 50 of Facebook users prefer haha to laughing out loud
No more LOLs 50 of Facebook users prefer haha to laughing out loud
Go to link download
Tuesday, October 18, 2016
Now You Can Send And Receive SMS on Facebook Messenger
Now You Can Send And Receive SMS on Facebook Messenger
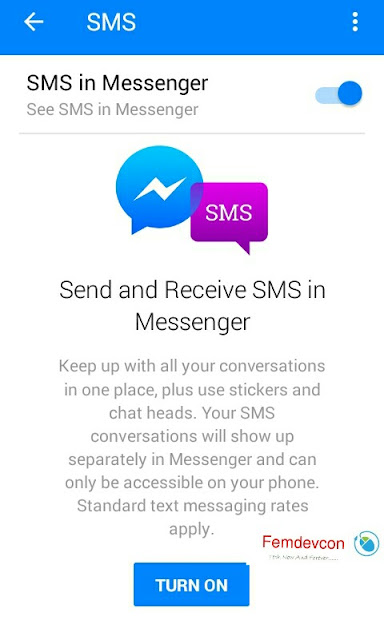
You can now get SMS messages on Facebook Messenger .
Meaning you now have the the choice to send and receive messages on Facebook Messenger and you dont have to go to different screen to communicate .
This Feautures is only Available on Android Devices for Now. And has soon been added to the latest Update of Facebook Messenger
Here is how to enable this feature
• Open your Messenger and Tap on setting ( the person icon)
•. Select "SMS" from the list
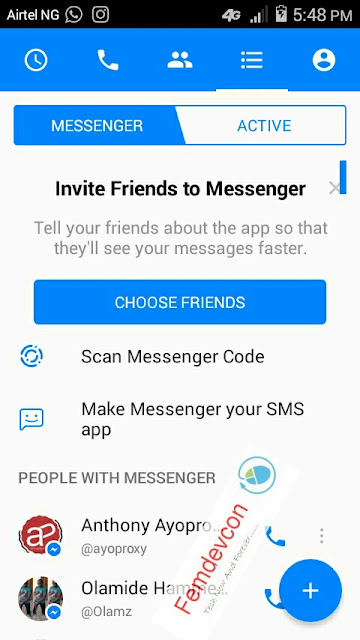
• Turn on "Default SMS App"

And you will be able to view and respond to your sms through Facebook Messenger.
This feature support standard text, video, images, Audio stickers,emojis and share location feautures
When you send an SMS, the recipient can be on any platform
Go to link download
Saturday, October 1, 2016
Our Facebook Fan Page
Our Facebook Fan Page
We have created our facebook fan page. it will get you updated with the latest tech in the world and will be update you on facebook.
To Like us Click Here.
Thanku
With Regards
Admin
To Like us Click Here.
Thanku
With Regards
Admin
Go to link download
Wednesday, September 7, 2016
New Stylish Facebook Fans Page Popup Like Box for Bloggers
New Stylish Facebook Fans Page Popup Like Box for Bloggers
Here is another wonderful facebook Popup Like Box for blogger. You should follow the step by step guideline for adding the Facebook Like Box widget into your blogger for increasing your facebook Fans page likes.
This box is normally appear after page load on your blog like you see it below.

Now Let us go for the business.
Added Facebook Like Box widget For blogger
Just follow this simple process below to added it now.
 Now find the below code by using Ctrl+F
</body>
Now copy and paste this below code before </body> tag.
<style type=text/css>
#haakblogFBpop {
position:fixed !important;
position:absolute;
top:-1000px;
left:50%;
margin:0px 0px 0px -182px;
width:300px;
height:auto;
padding:16px;
background:#FEFEFE;font:normal Dosis, Georgia, Serif;
color:#111;
border:2px solid #333;
-webkit-box-shadow:0px 1px 2px rgba(0,0,0,0.4);
-moz-box-shadow:0px 1px 2px rgba(0,0,0,0.4);
box-shadow:0px 1px 2px rgba(0,0,0,0.4);
-webkit-border-radius:10px;
-moz-border-radius:10px;
border-radius:10px;
}
#haakblogFBpop a.haakblogclose {
position:absolute;
top:-10px;
right:-10px;
background:#fff;
font:bold 16px Arial, Sans-Serif;
text-decoration:none;
line-height:22px;
width:22px;
text-align:center;
color:#000000;
border:2px solid #333;
-webkit-box-shadow:0px 1px 2px rgba(0,0,0,0.4);
-moz-box-shadow:0px 1px 2px rgba(0,0,0,0.4);
box-shadow:0px 1px 2px rgba(0,0,0,0.4);
-webkit-border-radius:22px;
-moz-border-radius:22px;
border-radius:25px;
cursor:pointer;
}
</style>
<script src=http://ajax.googleapis.com/ajax/libs/jquery/1.4.1/jquery.min.js type=text/javascript/>
<script type=text/javascript>
$(window).bind("load", function() {
// Animate Top
$('#haakblogFBpop').animate({top:"150px"}, 1000);
// Widget by www.haakblog.com
$('a.haakblogclose').click(function() {
$(this).parent().fadeOut();
return false;
});
});
</script>
<div id=haakblogFBpop>
<!-- Widget by www.haakblog.com Start -->
<center>
<b>Don't Forget To Join US Our Community</b></center>
<center>
<iframe allowtransparency=true frameborder=0 scrolling=no src=//www.facebook.com/plugins/likebox.php?href=https%3A%2F%2Fwww.facebook.com%2FSymbiangurus&width=300&height=258&show_faces=true&colorscheme=light&stream=false&show_border=false&header=false&appId=196282097100252 style=border:none; overflow:hidden; width:300px; height:258px;/>
</center>
<!-- Widget by www.haakblog.com End -->
<a class=haakblogclose href=#>×</a>
<center style=float:right; margin-right:10px;>
<span style=font-size:xx-small; color:#000; text-decoration:none;></span>
<a href="http://www.haakblog.com" rel="dofollow" target="_blank" title="blogger"><img src="https://bitly.com/haakblog" alt="blogger" border="0" style="position: fixed; bottom: 10%; right: 0%;" /></a><a href=hhttp://kudantown.blogspot.com/2014/02/new-stylish-facebook-fans-page-popup.html style=font-size:xx-small; color:#3B78CD; text-decoration:none; target=_blank>Widget</a></center>
</div>
Dont forget to change Symbiangurus to your Facebook Fans page name.
Then Click on Save Template youve Done, now view blog and see it.
Special thanks to Haakblog for giving this tutorial.
Join our Facebook Group discussion for more hot update.
This box is normally appear after page load on your blog like you see it below.
Now Let us go for the business.
Added Facebook Like Box widget For blogger
Just follow this simple process below to added it now.
- Login to your blogger dashboard.
- Scroll down to Template and click on Edit HTML as shown in the picture below.
Now find the below code by using Ctrl+F</body>
Now copy and paste this below code before </body> tag.
<style type=text/css>
#haakblogFBpop {
position:fixed !important;
position:absolute;
top:-1000px;
left:50%;
margin:0px 0px 0px -182px;
width:300px;
height:auto;
padding:16px;
background:#FEFEFE;font:normal Dosis, Georgia, Serif;
color:#111;
border:2px solid #333;
-webkit-box-shadow:0px 1px 2px rgba(0,0,0,0.4);
-moz-box-shadow:0px 1px 2px rgba(0,0,0,0.4);
box-shadow:0px 1px 2px rgba(0,0,0,0.4);
-webkit-border-radius:10px;
-moz-border-radius:10px;
border-radius:10px;
}
#haakblogFBpop a.haakblogclose {
position:absolute;
top:-10px;
right:-10px;
background:#fff;
font:bold 16px Arial, Sans-Serif;
text-decoration:none;
line-height:22px;
width:22px;
text-align:center;
color:#000000;
border:2px solid #333;
-webkit-box-shadow:0px 1px 2px rgba(0,0,0,0.4);
-moz-box-shadow:0px 1px 2px rgba(0,0,0,0.4);
box-shadow:0px 1px 2px rgba(0,0,0,0.4);
-webkit-border-radius:22px;
-moz-border-radius:22px;
border-radius:25px;
cursor:pointer;
}
</style>
<script src=http://ajax.googleapis.com/ajax/libs/jquery/1.4.1/jquery.min.js type=text/javascript/>
<script type=text/javascript>
$(window).bind("load", function() {
// Animate Top
$('#haakblogFBpop').animate({top:"150px"}, 1000);
// Widget by www.haakblog.com
$('a.haakblogclose').click(function() {
$(this).parent().fadeOut();
return false;
});
});
</script>
<div id=haakblogFBpop>
<!-- Widget by www.haakblog.com Start -->
<center>
<b>Don't Forget To Join US Our Community</b></center>
<center>
<iframe allowtransparency=true frameborder=0 scrolling=no src=//www.facebook.com/plugins/likebox.php?href=https%3A%2F%2Fwww.facebook.com%2FSymbiangurus&width=300&height=258&show_faces=true&colorscheme=light&stream=false&show_border=false&header=false&appId=196282097100252 style=border:none; overflow:hidden; width:300px; height:258px;/>
</center>
<!-- Widget by www.haakblog.com End -->
<a class=haakblogclose href=#>×</a>
<center style=float:right; margin-right:10px;>
<span style=font-size:xx-small; color:#000; text-decoration:none;></span>
<a href="http://www.haakblog.com" rel="dofollow" target="_blank" title="blogger"><img src="https://bitly.com/haakblog" alt="blogger" border="0" style="position: fixed; bottom: 10%; right: 0%;" /></a><a href=hhttp://kudantown.blogspot.com/2014/02/new-stylish-facebook-fans-page-popup.html style=font-size:xx-small; color:#3B78CD; text-decoration:none; target=_blank>Widget</a></center>
</div>
Dont forget to change Symbiangurus to your Facebook Fans page name.
Then Click on Save Template youve Done, now view blog and see it.
Special thanks to Haakblog for giving this tutorial.
Join our Facebook Group discussion for more hot update.
Go to link download
Thursday, September 1, 2016
Nimbuzz Launched Facebook Game Get Connected
Nimbuzz Launched Facebook Game Get Connected

Hey Friends, Nimbuzz has launched a really cool game on its Facebook page called ‘Get Connected’. And the game where the challenge is to connect with as many Nimbuzz Users as possible with a single click. Youve got one click and you got to make it count! So open the game tab and click on ‘Start’ to begin the game. The connections move rapidly across the screen and you have to figure the most appropriate place to connect with maximum possible people and hit the left click button on your mouse.
If youve got time to kill, or you’re bored, or just simply tired of working, then this game is a perfect way to unwind without having to leave your seat. If you’re ready for some connected fun, try out the game HERE.
Go to link download
Subscribe to:
Posts (Atom)